Run Keycloak in production mode in windows with HTTPS
- To run keycloak in production mode, certificates and hostname are to be configured at the least
- Let us setup keycloak in windows
Install OpenJDK
- Download OpenJDK zip file. Refer to Keycloak documentation for the minimum JDK version required for the Keycloak being installed (https://www.keycloak.org/getting-started/getting-started-zip)
- Extract the zip file to a folder like
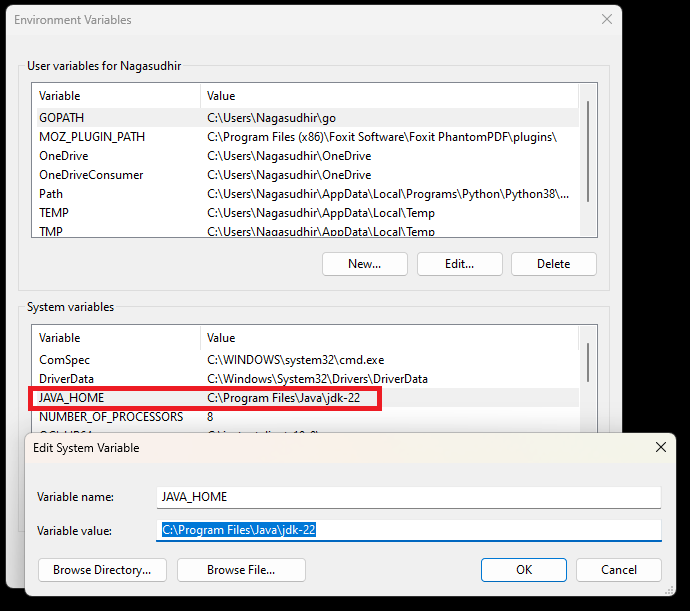
C:\Program Files\Java\jdk-22 - Set the environment variable named JAVA_HOME and assign the jdk folder path to it (Example
C:\Program Files\Java\jdk-22)
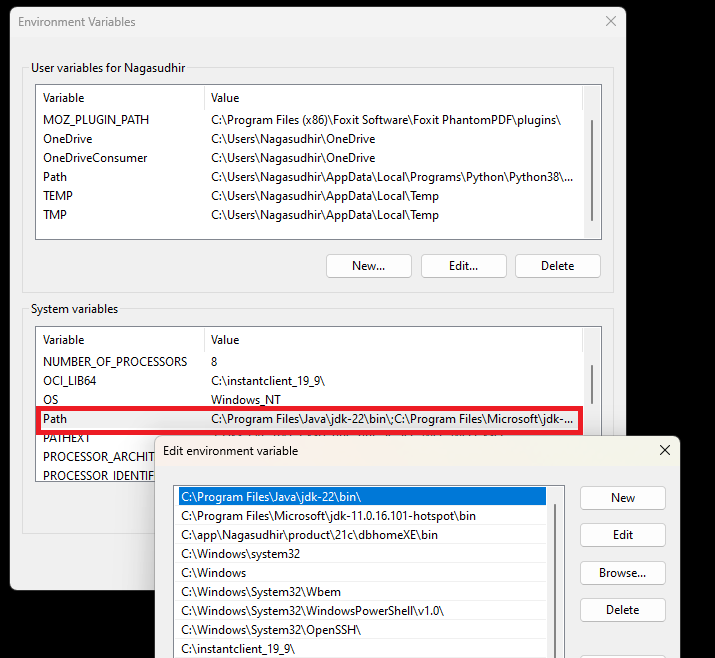
- Add the java bin folder path to the environment variable PATH (Example:
C:\Program Files\Java\jdk-22\bin)
Install Keycloak
- Download Keycloak zip file from https://www.keycloak.org/downloads
- Unzip into a folder like
C:\keycloak-24.0.2 - Now Keycloak is ready to run
Run keycloak in development mode
- Open a command prompt in the Keycloak folder
- Run the command
.\bin\kc.bat start-devto run Keycloak in development mode
Run Keycloak in production mode
- Keycloak can be configured from the
conf/keycloak.conffile present in the Keycloak folder
Setup the Keycloak hostname
- Add the hostname information in the
keycloak.conffile with the settinghostname=localhost. - The hostname can be localhost or IP address or hostname or domain name.
- This makes Keycloak to allow only the requests with the configured hostname in the request header
- To allow all hostnames, the setting
hostname-strict=falsecan be kept in thekeycloak.conffile
Setup the certificate
- Keycloak requires the certificate for running in production mode
- Certificate is used by Keycloak for public and private keys
- Certificate can be taken from a certificate authority or a self-signed certificate can be generated.
- A self-signed certificate can be generated using openssl using the below command. Openssl can be accessed from a git bash. Run the below command in the conf folder of Keycloak so that the files are generated there.
openssl req -x509 -nodes -days 365 -newkey rsa:2048 -keyout kc.key.pem -out kc.crt.pem

- The command will generate two pem files each for certificate identity and private encryption key of the certificate.
- The certificate files can be configured in
keycloak.conffile using the below lines
# The file path to a server certificate or certificate chain in PEM format.
https-certificate-file=${kc.home.dir}/conf/kc.crt.pem

# The file path to a private key in PEM format.
https-certificate-key-file=${kc.home.dir}/conf/kc.key.pem
Run keycloak
- Open a command prompt in Keycloak folder and the following command
.\bin\kc.bat start
- Now keycloak will run in production mode
Configure HTTPS port
- By default Keycloak listens on 8443 port over HTTPS
- To configure HTTPS port, write the following in
keycloak.conffile
https-port=8443
Enable HTTP
- By default Keycloak does not run over HTTP in production mode
- To enable HTTP and control the HTTP port, write the following in
keycloak.conffile
http-enabled=true
http-port=8080
Tips
- To verify the Keycloak settings in command line, use
.\bin\kc.bat show-config - See more information about errors using --verbose in the command. Like
.\bin\kc.bat --verbose start - Write --help at the end of any command to see the options in command line. Like
.\bin\kc.bat start --help
Video
You can see the video for this post here
References
- Refer the official guides under the “Server” section for further reading at https://www.keycloak.org/guides
- All the keycloak configuration (
keycloak.conffile) options can be found at https://www.keycloak.org/server/all-config - Official Keycloak installation guide - https://www.keycloak.org/getting-started/getting-started-zip
Comments
Post a Comment