Control an LED with flask web server hosted on Raspberry pi
- The GPIO (General Purpose Input Output) pins of Raspberry Pi can be controlled by its operating system
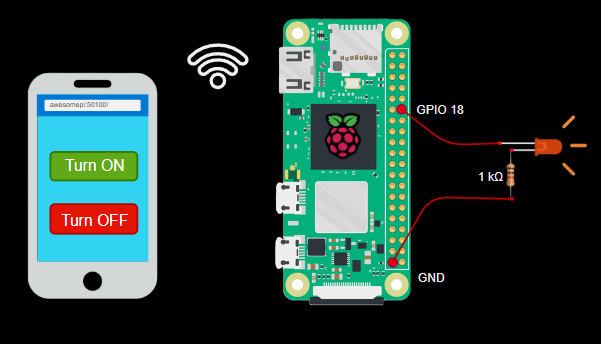
- Let us control an LED connected to Raspberry Pi Zero W from the buttons on a web page served from a python flask web server hosted by the Raspberry Pi
Raspberry pi zero w pin layout
- Following is the pin layout of Raspberry pi zero w. For this project, we will use the Ground (pin 39) and GPIO18 (6th pin on the right).
- The GPIO18 pin voltage will be controlled by the python code which will be connected to the LED

Simple LED blinking python code

- Let us create a simple python code to blink an LED indefinitely
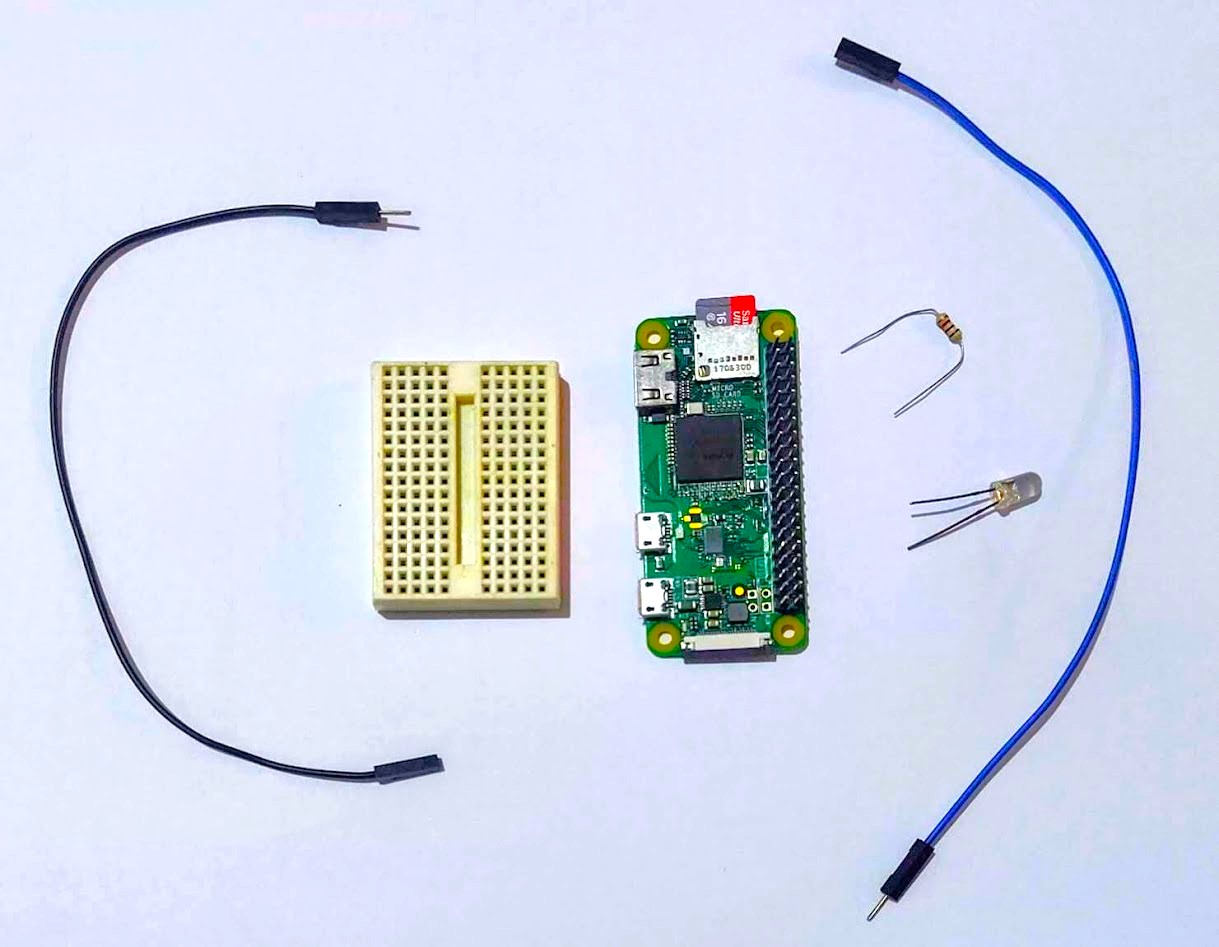
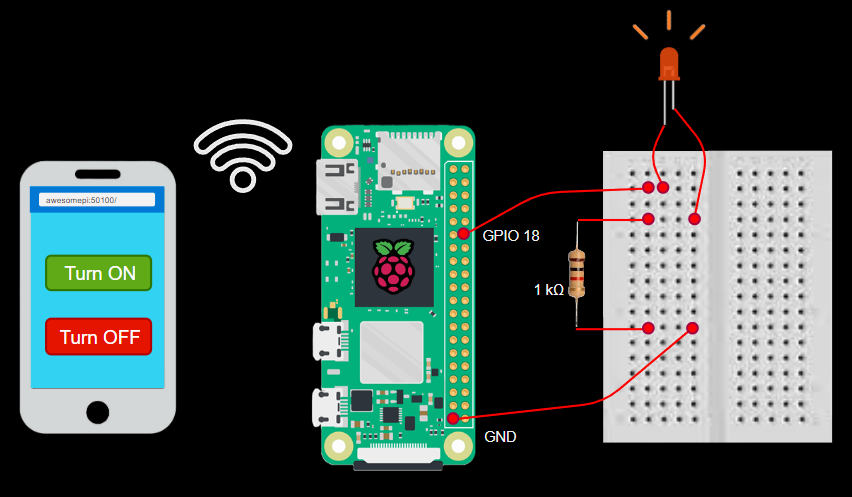
- We can use a mini breadboard and jumper wires as shown above to create the connections of the circuit
- GPIO 18 pin can be connected to anode (longer lead) of LED. One end of a 1k resistor can be connected to cathode (shorter lead) of LED and another end of the resistor can be connected to the ground pin of Raspberry pi
- The 1k resistor is used to limit the current flowing through the LED so that the Raspberry pi and LED are not damaged
- The python code below uses GPIO 18 pin for controlling the LED voltage. The RPi python module is being used for interfacing with Raspberry pi GPIO pins
# led.py
import RPi.GPIO as GPIO
import time

ledGpioPin = 18
GPIO.setmode(GPIO.BCM)
# GPIO.setwarnings(False)
GPIO.setup(ledGpioPin,GPIO.OUT)
isLedOn = True
while True:
    outVoltage = GPIO.HIGH if isLedOn else GPIO.LOW
    GPIO.output(ledGpioPin, outVoltage)
    print(isLedOn)
    time.sleep(1)
    isLedOn = not isLedOn
LED control with Flask server
- Let us create a flask web server that serves a web page using which the user can control the LED state with buttons in the web page. Any device with a web browser in the WiFi network of Raspberry pi can access the webpage of the flask server and control the LED state.
- The file
[piUtils.py](<http://piUtils.py>)exports a functionsetLedStatewhich can turn on or turn off the LED connected to GPIO pin 18. This function will be used by the flask server to control the LED based on the button click in the web page
# piUtils.py
# This code also runs in PC with a dummy LED control function

ledPin = 18
isRpiPresent: bool = True
try:
    # import raspberry pi module
    import RPi.GPIO as GPIO
except:
    isRpiPresent = False
    print("RPi module not present...")

def setDummyLedState(isLedOn: bool):
    print(f"setting dummy led state as {isLedOn}...")

# setup the setLedState function
setLedState = setDummyLedState

if isRpiPresent:
    # initialize the GPIO pin for LED output
    GPIO.setmode(GPIO.BCM)
    # GPIO.setwarnings(False)
    GPIO.setup(ledPin, GPIO.OUT)

    def setPiLedState(isLedOn: bool):
        print(f"setting led state as {isLedOn}")
        outVoltage = GPIO.HIGH if isLedOn else GPIO.LOW
        GPIO.output(ledPin, outVoltage)
    setLedState = setPiLedState
- The flask server code below serves a HTML page
index.htmlat root URL which contains the buttons to control the LED. The server also has a POST request API endpoint/led/<state>which controls the LED based on the last segment of the URL
# server.py
from flask import Flask, render_template
from piUtils import setLedState

# create a flask server
app = Flask(__name__)

@app.route('/')
def index():
    return render_template('home.html')

@app.route("/led/<int:state>", methods=['POST'])
def setLed(state):
    # route for led control
    if state == 0:
        setLedState(False)
    elif state == 1:
        setLedState(True)
    else:
        return ('Unknown LED state', 400)
    return ('', 204)

# __name__ will be __main__ only if this file is the entry point
if __name__ == '__main__':
    # run the server on this ip and port 50100
    app.run(host='0.0.0.0', port=50100, debug=True)
- The
index.htmlpage in the templates folder contains the HTML and styling for the LED ON and LED OFF buttons. Upon clicking the buttons, the JavaScript click handlers send POST request to the server API endpoint at/led/0or/led/1to send LED switch ON or switch OFF commands to the flask server
<!-- templates/home.html -->
<!DOCTYPE html>
<html lang="en">

<head>
    <meta charset="UTF-8">
    <meta name="viewport" content="width=device-width, initial-scale=1.0">
    <title>Raspberry Pi LED demo</title>
</head>

<body>
    <div style="text-align: center;">
        <h1>Control LED connected to Raspberry Pi</h1>
        <button onclick="onLedOn()" class="onBtn">Turn ON</button>
        <br>
        <br>
        <button onclick="onLedOff()" class="offBtn">Turn OFF</button>
    </div>
</body>

<script type="application/javascript">
    const setLedState = async (isLedOn) => {
        const fetchSettings = { method: 'POST' };
        const fetchResponse = await fetch("/led/" + (isLedOn ? 1 : 0), fetchSettings);
        if (!fetchResponse.ok) {
            alert("command not executed by raspberry pi...");
        }
    }

    function onLedOn() {
        setLedState(true);
    }

    function onLedOff() {
        setLedState(false);
    }
</script>

<style>
    button {
        color: white;
        padding: 1em;
        font-weight: bold;
        font-size: 2em;
    }

    .onBtn {
        background-color: #60A917;
    }

    .onBtn:active {
        background-color: #56703c;
    }

    .offBtn {
        background-color: #E51400;
    }

    .offBtn:active {
        background-color: #8c3730;
    }
</style>

</html>
Video
The video tutorial for this post can be found here
References
- Raspberry Pi docs - https://www.raspberrypi.com/documentation/
- Raspberry pi GPIO pins docs - https://www.raspberrypi.com/documentation/computers/raspberry-pi.html
Comments
Post a Comment